~Laura
Pages
▼
Tuesday, January 31, 2012
Monday, January 30, 2012
Monday Updates with Current Projects
So Monday is supposed to be my "updates" day but I've been pretty bad at that lately! To improve, I have some "before" photos of a large master bath that I'm working on a layout for. Looking pretty fun at this stage, huh?
I'll keep you updated on this project, as well as another bathroom I'm working on which is almost complete! I should have some photos up in another couple of weeks.
I seem to be getting a lot of bathrooms lately. Not that I'm complaining! They're one of my favorite spaces to work with!
I'll keep you updated on this project, as well as another bathroom I'm working on which is almost complete! I should have some photos up in another couple of weeks.
I seem to be getting a lot of bathrooms lately. Not that I'm complaining! They're one of my favorite spaces to work with!
~Laura
Friday, January 27, 2012
Friday Feature: Katie Ridder
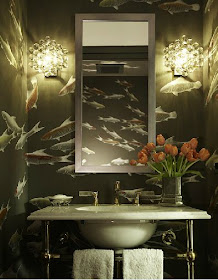
These gorgeous interiors by New York based designer Katie Ridder pretty much speak for themselves. I love the perfect combo of sophistication and that feeling of everyday comfy living. I also love the funky accents such as the disco ball in the dining room or the fish wallpaper in the bathroom. Every room is so beautiful and different that I'm having a hard time choosing favorites. Therefore there are a ton of images to look through. Enjoy!
Have a great weekend!
~Laura
Have a great weekend!
~Laura
Thursday, January 26, 2012
Tuesday, January 24, 2012
Monday, January 23, 2012
Closet Makeover
Last weekend my husband and I took on a short project that I've been wanting to do for the past year since moving into our house. The one bad thing about old houses is the lack of storage. We have a decent size walk-in closet in the hallway but it has zero shelf space. And there's no linen closet so the hall closet has to double as the linen and coat closets. I needed a solution to the shoe rack I've been using as shelving!
I'm pretty embarrassed to show how messy this closet has been for the past year but a lack of storage can lead to a disastrous situation. This is REAL, people! haha
Here's the before:
And here we are after most of the crap has been hauled out. I put all my extra throw pillows lined up on the top shelf - I don't know why I never thought of this before! Probably because the closet was such a headache, I avoided it at all costs.
Here you can see we removed the top hanging bar because we just need one. Brian also cut the wood boards to length for the shelves.
Here I am lookin like a bum and painting the shelves.
They're all primed and painted.....next step is the installation.
We simply used 1" x 3" boards for the shelf brackets. That's what was used before so we just kept it the same. Nothing fancy!
Make sure the brackets are level and at the exact same height across from each other so that the shelves lay nice and flat.
Here we have all the shelves installed and are waiting for them to finish drying before putting everything away. Each shelf has two boards to make the shelves extra deep for more storage. They are about 16" deep - it's hard to tell from the photo.
And here's the AFTER:
Ahhhh, much better!
Before: After:

This has been perhaps my most rewarding project due to the stress reduction upon completion. It only took us about 4 hours to complete (and that's only because we had to wait for the paint to dry!) and cost about $20.
Now I just need to figure out a place to store my vacuum!
I'm pretty embarrassed to show how messy this closet has been for the past year but a lack of storage can lead to a disastrous situation. This is REAL, people! haha
Here's the before:
And here we are after most of the crap has been hauled out. I put all my extra throw pillows lined up on the top shelf - I don't know why I never thought of this before! Probably because the closet was such a headache, I avoided it at all costs.
Here you can see we removed the top hanging bar because we just need one. Brian also cut the wood boards to length for the shelves.
They're all primed and painted.....next step is the installation.
We simply used 1" x 3" boards for the shelf brackets. That's what was used before so we just kept it the same. Nothing fancy!
Make sure the brackets are level and at the exact same height across from each other so that the shelves lay nice and flat.
Here we have all the shelves installed and are waiting for them to finish drying before putting everything away. Each shelf has two boards to make the shelves extra deep for more storage. They are about 16" deep - it's hard to tell from the photo.
And here's the AFTER:
Ahhhh, much better!
Before: After:

This has been perhaps my most rewarding project due to the stress reduction upon completion. It only took us about 4 hours to complete (and that's only because we had to wait for the paint to dry!) and cost about $20.
Now I just need to figure out a place to store my vacuum!
~Laura


