Friday, July 22, 2011

Weekend Project - Refurbish an Old Chair

I found this Mid-century modern chair at a thrift store and purchased it for about 7 bucks - great steal I know! Structurally it was in great shape - very sturdy, no chips in the wood, etc. Appearance wise it wasn't in such great shape. It was covered in an ugly orange (almost day-glow as I'm sure you can tell by the picture!) velour fabric with stains. Trust me, the photo makes it look waaaay better than how it actually looked in person.


The first thing I did was remove the cushions and sand the entire frame using a fine sand paper. Luckily, the previous finish was so old it flaked right off. It was the easiest thing I have EVER sanded.

Next I treated the wood with a wood conditioner to get it ready to stain. Once that set in it was time for the stain. I selected a slightly darker color than the original color. The name of the stain was "dark walnut." Using a rag I dipped a corner of it into the stain and massaged it into the wood. Staining is always done much easier with a rag than with a brush because you have more control using your hands and its less likely to create bubbles in the finish. However, when using a rag make sure you wear gloves....and thick rubber gloves work best. I wore surgical latex gloves and had to changed them several times because the chemicals ate through the latex creating holes which then stained my fingers and fingernails. Walking around with "dark walnut" cuticles for a week isn't very attractive.

I did 3 coats of the stain and then touched up some of the lighter areas in the wood to get as even of a finish as I could. Once that sat for a day I put on the top coat of a clear polyurethane. I did 2 coats of the satin polyurethane to give it a nice even sheen.

Next up is the cushions. Luckily, the cushions were in good shape. The inside cotton batting was almost perfect so I didn't have to worry about rewrapping the springs. They also didn't smell or anything like that - hey, with thrift store finds you don't know where they may have come from!

The fabric I selected is by Robert Allen and is called Ming Fret in taupe. The fabric was the most expensive part of redoing the chair since the fabric retails at $75 /yd - but you can get an awesome price on it here!

Brian's mom did all the sewing (she's awesome! :) for the cushions and added the cording (previously there was none) as well as zippers so that the covers are removable.

Glad to have this amazing chair refinished and currently sitting in my living room - it seems to travel from room to room a lot because it pretty much looks good anywhere. For a total cost of about $90 for everything, this was a great project.

Thursday, July 21, 2011

Before & After: Pied-a-Terre

The "after" pictures are finally here! (Really, this project is still in the works with a few odds and ends, but it looks good enough now to share!) The original post about this apartment plan can be viewed here.

Here's a "before" shot again of the general room after entering the front door:


And here's the after:


The bed is the leather Jameson bed from Pottery Barn. The beautiful Asian inspired armoire can be ordered online here.


This sofa is a sleeper sofa for guests and turns into a queen size bed. The sofa is by Cassius and can be found here.


This carved wooden wall hanging already belonged to the client that he got from Thailand. It fits perfectly over the sofa.....isn't it gorgeous?!


Here's a "before" shot again of the entry and the soon to be kitchen/dining spaces:


And here's the after:


The bar and stools is compact and fits the overall zen feel the client wanted. The table can fold in half and the barstools tuck neatly underneath.


Before:

And After:

One of the space planning challenges was that the client wanted a full size fridge and stove in the "kitchen." As a compromise I selected a counter-depth fridge to save a little space. Another challenge was where to put the tv since the client wanted it viewable from the sofa, the bed, and the eating area. Since the wall above the countertop didn't serve any storage space, the tv works out perfectly here! All the wires are hidden neatly in a hole drilled through the brick wall. The teak floors really add to the clean, contemporary look and compliment the cabinetry nicely.

And look at this amazing granite!!


And lastly, the biggest challenge in creating this apartment was the bathroom. The bathroom did not exist before so we built it out into the garage since the garage was extra deep anyway.

Here it is!


Here's a picture of the general layout:


Be sure to check out my website later today for more pictures from this project!

Wednesday, July 20, 2011

Beautiful Beds

There are so many different options when it comes to beds to the bedroom. Here are some that are so whimsical, romantic and dreamy, they make me want to curl up with Alfie and go right to sleep. I think Alfie would approve of that plan.

This first one is so insanely beautiful that I had to include more than one photo. It looks like something straight from Rivendell. And in case you're not a big nerd like me and don't know what that is, scroll down.


This, is Rivendell :)


This is Dracula's Bed from Bran castle in Romania:


I promise this entire post is not centered around fairytale beds. I just wanted to get those out of the way first..........although these certainly are fairytale-esque!


This one I couldn't resist including in here. Not that the bed is really anything that special, just the room as a whole. I think I could sleep forever in there.......and would probably end up being a bad thing, haha
And since I really do love contemporary design as well, although its been placed on the back-burner since I bought a historical house, here are some for the ultra hip.


And last but not least is this bed from Anthropologie that I've had a crush on for like a year now. I really hope I can get this one day for my guest room. Whatcha think?

Tuesday, July 19, 2011

The Elsmore's Attic

I said awhile ago I would post some "before" photos of the attic. Since I spent a lot of time this weekend cleaning and I moved all the stuff that was sitting in front of the attic door, I was finally able to get up there and snap a couple of shots. Here ya go:

These are the stairs that lead up to the attic. I'm standing in the attic looking down to the door that takes you into the dining room.


This gable extends over the front porch. The little window is currently the only window in the attic.


It's kind of hard to get a feel for the layout with these photos but its basically one large open area over the entire house with one gabled area that extends over the front porch.

Lots of potential! And with the addition of a few more gables and/or dormers, more of this space will be useable.

Monday, July 18, 2011

Geek Interiors

Finally, some interior furnishings for the unfortunately not-so-stylish geeks. These items are raising the bar for those who consider tv trays and computer parts interior decoration.

(o.k., I admit it. Some of these things are seriously cool.)


These pillows are inexpensive (80 bucks for all 3), eco friendly AND can be purchase on Amazon! What more could a geek want?


LED carpeting anyone? Can you imagine how cool this would be in a home movie theater? I can't promise this product to be easy on the wallet but check out LamaConcept for more info.

These Rubiks Cube tables would look great in front of a clean-lined contemporary sofa.


This do-it-yourselfer created an illuminated coffee table from old circuit boards. Smart AND handy! :)


Nothing says welcome like a barcode doormat!

And for those you don't want to welcome at the door, there's always this:


The "Shift" chair by Simone Micheli is definitely not my taste (I just imagine wearing shorts and sticking to the vinyl when you try to stand up) but I suppose it could look trendy in a teenager's room. But what parent is going to spend $3,900 on a chair for their kid's room?


You're probably looking at this thinking "whats so geeky about this chair?" Well, I'm not talking about the chair but rather the custom print of your own DNA hanging on the wall.

They even make them for him and her.....how sweet!


Maybe the answer to our obesity problem in the US is a fridge that only opens by fingerprint recognition. Electrolux's Screenfridge is still in the works. It was first created and tested as a prototype in 2001 but has yet to be released to the general public. I'm sure its only a matter of time though. The fridge will also include Internet, television, radio, cell phones, and broadband. It also has a small video camera to record messages from family members, and can store shopping lists and the family calendar. The Screenfridge can suggest dinner ideas based on the contents of the refrigerator, and if you forget your shopping list at the grocery store, no biggie! Just call up and ask your fridge! duh!

Friday, July 15, 2011

Bathroom Update.....

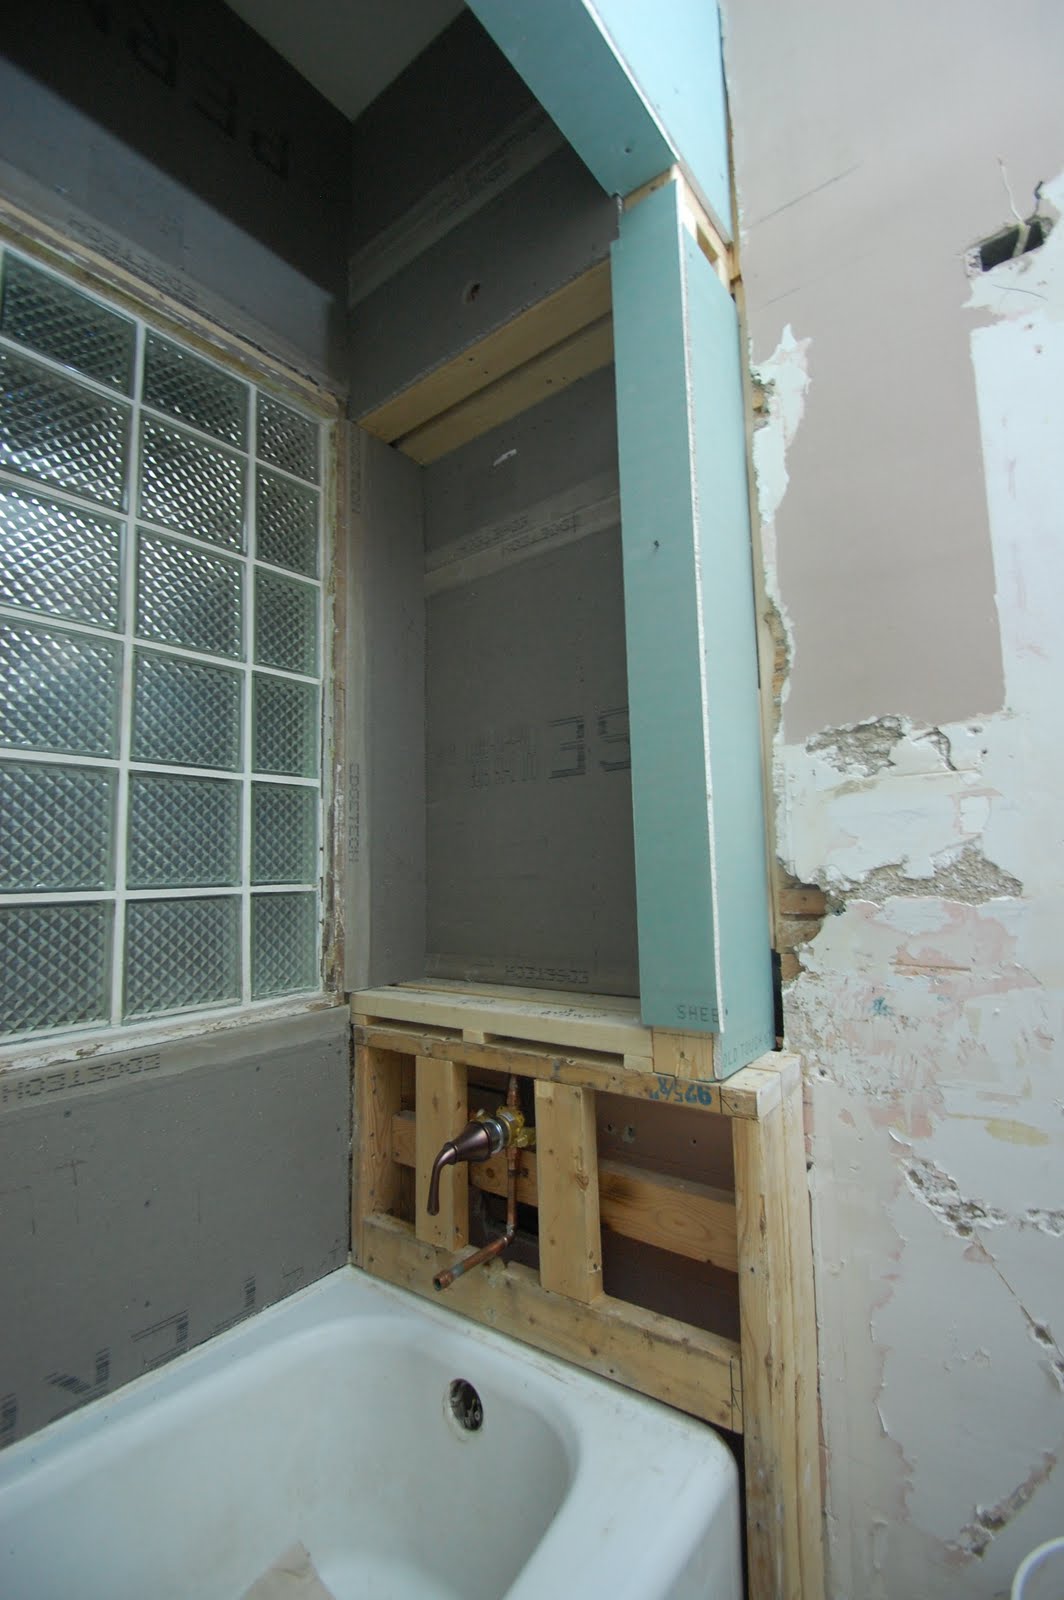
So now that its been over a month and our bathroom is nowhere near completion, and bonus!!, we now have a real deadline since I'm hosting a bridal shower for my sister at my house a week from tomorrow! I caved and called in the backup troops (meaning: my dad, Tim the Toolman)

He finished up the framing and most of the cement board and drywall.
There is still a little more cement board to go up but at least the majority is now done and its starting to look like a real shower again.


We will install a light/fan combo in the shower ceiling.


Pretty, shiny new plumbing!

And if you look closely you can see the original "tile" in the back....its pink. And its not really tile, they just stamped the final layer of plaster to look like tile. Kind of fun. And I like that we're leaving it there for the next remodelers, who knows when down the road, to find.


o.k., so this wall is still a huge mess. We worked on scraping off some of the paint since it was not sticking to the drywall compound from before. We also removed the "arm" of the banjo countertop to prepare for the new countertop to go in. I'm hoping to get all this smoothed and painted this weekend. Could take a bit longer though because all the electrical has to be repositioned for the new light and receptacles.


And COOL! We found the original floor tile underneath the cheapo floral vinyl. I am going to work on peeling more of the vinyl up to see if it can be salvaged. If we can get it to look good I will consider keeping it. Otherwise, we'll go with our original plan with the pennies.


I now feel inspired to keep going with this and work even harder to get it finished! Can't wait to reveal the finished product to you.....I really think it will be luxurious and beautiful. At least, it HAS to be better than my shower I'm currently using in my basement!

Thursday, July 14, 2011

A Grand Entrance

A first impression of your home begins at the front door. The front door is also said to be a reflection of those living within. Most front doors I come across are boring or an afterthought (especially on new, cookie cutter homes!) and nothing is worse than a terribly faded door.

To add a punch to the look of your home, I recommend getting out of the box by choosing a knock-out bright color. Chances are, it will create more of a focal point for the house and you will get tons of compliments! Painting your front door will take about an hour to do and can be changed often since its so easy. If you choose a color you don't like, big deal! It can be painted again. Also, the color of your front door can be totally unique - it does NOT have to match your trim or shutters or anything else on the house. Now, that's not to say to go out and choose some color that will totally clash with everything else. It just means don't be afraid to get out of your comfort zone.

I give these doors an A+ for effort........in addition to looking amazing!!


bright pink? Why not?!

So now I think its only fair for me to post pictures of my own front door so here goes:


O.k., so I know you're probably muttering "hypocrite" under breath right about now but let me explain! First of all, these photos are from when the house was on the market so I have a few changes since then. Secondly, I feel my door is in the "antique" category - meaning I can't paint it. Believe me, I really wish I could! I've always wanted a crazy colored front door!


Instead, I have what I call my "Beauty and the Beast" door.


And you have to admit that, despite my lack of paint color, my doorknocker is pretty B.A.


xoxo, happy painting!