


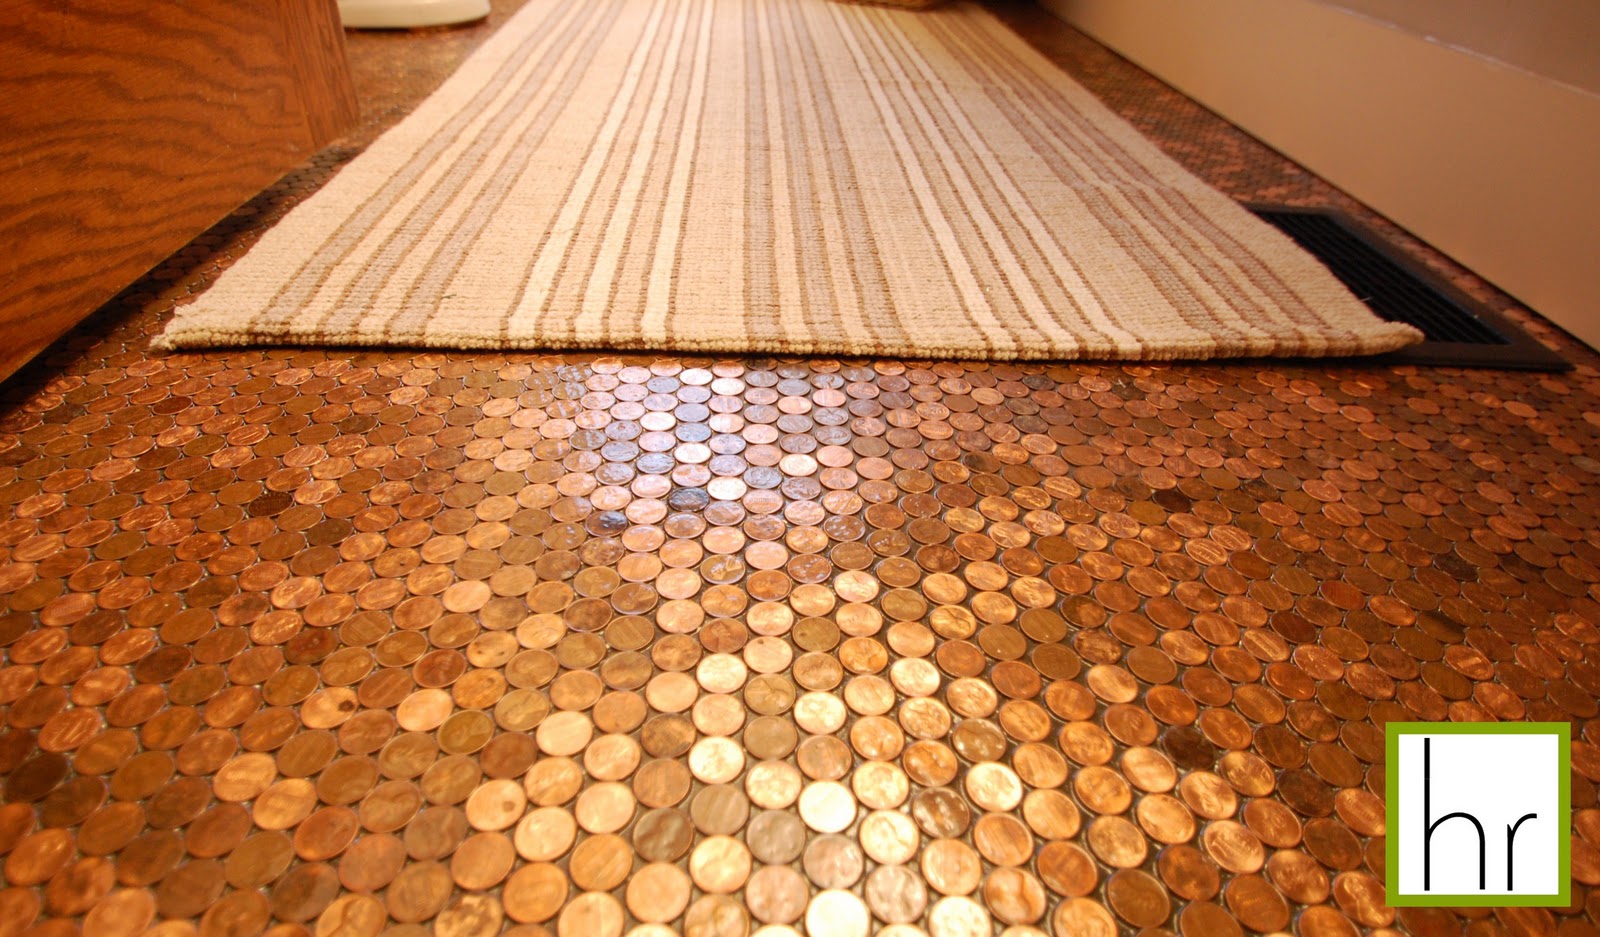
One of the more unique features of our new bathroom is the penny floor made up of real pennies, not penny tiles. The floor was super easy to do - but it is difficult finding the patience to lay the pennies one by one. Brian and I worked on the floor little bits at a time.
The first thing we had to do was remove the vinyl floor that was previously installed. This was a huge pain and was the hardest part of the floor project. We got a special floor stripper to help remove the glue. Underneath the vinyl was the original tile that we had hoped to keep but once all the vinyl was off we saw it was not on very good condition.


It took hours and hours to get the entire floor to look as good as the photo above! Once all the floor was scraped and smooth (and after some minor repair work to fix a crack) the tile floor was primed and painted a dark gray. I would have been happy leaving it the dark gray but Brian insisted we stick to our original plan of the pennies.


We gathered as pennies as we could from family and friends and then went to the bank to get the rest. We started in the back corner of the bathroom where it wouldn't be obvious if we screwed up and started gluing them one by one. We just used tacky glue and regular ol' Elmer's glue to glue them down. One thing we learned was to go in one direction the entire time. We started going in multiple directions and because one of the walls was crooked, our lines got a little off. Because the penny floor is busy, the mistakes aren't that noticeable.
Once the floor was covered with pennies we sealed them in and down with a thick coat of a high gloss polyurethane. Since polyurethane is a softer material, for the final top coat we used a clear epoxy similar to this photo:

It had two bottles you pour together, and then pour over the entire floor. We had out dehumidifier plugged in and sat in in the bathtub to help dry it out faster. It also helped the fumes from getting too strong in the rest of the house.
That was pretty much it! Easy peasy. I have more pictures of us laboriously laying the pennies that I will post later (they're not on my computer right now). It really was an easy project and it looks beautiful now that its finished. The pennies are all different colors and some are shiny while others are dull. Here's some interesting facts:
The entire floor cost about $100 so there are roughly 10,000 pennies on the floor!
There are 23 Canadian pennies on the floor
There are19 wheat pennies on the floor
The oldest penny we found was an Indian Head from 1893. We did not put that one on the floor but it IS in the bathroom somewhere :)
The oldest penny actually on the floor is from 1945.
~Laura
That is the coolest bathroom floor I've ever seen! Great job!
ReplyDeleteExcellent job.
ReplyDeleteDid the sealer fill in the areas inbetween the pennies?
ReplyDeleteYes, this was the main reason why we sealed it. I had it for a few days before the sealer went on and already there was a little bit of dirt in the cracks that had to be vacuumed out before the sealer went down. The floor would be a pain to clean without sealing it!
DeleteThanks for looking!
~Laura
i totally want to do this in our kids' bathroom! the floor in there is horrendous and it isn't too big so i might just be able to pull this off. thanks for sharing your process :)
ReplyDeleteif the pennies are securely glued.... is it necessary to use the sealer on top ? are they hard or uncomfortable to walk on ?
ReplyDeleteHi Rose,
DeleteThe pennies were glues down prior to sealing but I wouldn't say they were securely glued. A few of them popped off before we sealed them down. Also, without sealing them down dirt gets down between the pennies and makes it hard to clean. I definitely recommend sealing the floor.
They are not hard or uncomfortable to walk on. I would say they are perhaps colder on the feet than a tile floor, though.
Thanks for looking!
~Laura
Wow so cool! What great minds you both have. I love the fact that you basically recycled pennies into a lovely floor! Bravo!
ReplyDeleteDoes it get hot in the sunlight?
ReplyDeleteNope, it doesn't get hot at all. Then again, it's not really in direct sunlight much. The only window in the bathroom has frosted glass blocks which diffuse the light. I would still guess that it wouldn't get too hot.
DeleteThanks for reading!
~Laura
How is the epoxy holding up under the stress of cleaning, etc. Does it still look as good as the first day it was completed?
ReplyDeleteHi Mandy,
DeleteYes, it is still holding up nicely. I didn't put a super thick coat of epoxy down, just enough to fill in the cracks and do a thin top over the pennies. Because of some of the ridges of the pennies showing through, I think that helps hide and scratches or blemishes that might otherwise show up. I haven't noticed any though.
Hope this helps!
~Laura
I am thinking a very cool place for this may be our bar top in the family room! Thanks so much for the inspiration :)
ReplyDeletelooks like a great project. Would be a good one for kids to help with, with little possibility of major problems.
ReplyDeleteWill be using this in my home soon, kitchen and bath. But i think I will be adding powdered pigment to the resin, and use a blowtorch to work out the bubbles
That sounds great! Good luck with your project!
DeleteLaura
If you use a blowtorch be sure to only use pre-1982 pennies, as the rest are made of zinc and could emit dangerous gas.
DeleteAs beautiful as that is... and it is VERY beautiful... isn't it considered defacing our currency (isn't that a crime)?
ReplyDeleteYes, defacing US currency is considered a crime and this question actually crossed my mind before we began the project so I did a little research. Defacing US currency is explained in US State Code Section 333: Mutilation of national bank obligations
Delete"Whoever mutilates, cuts, defaces, disfigures, or perforates, or
unites or cements together, or does any other thing to any bank
bill, draft, note, or other evidence of debt issued by any national
banking association, or Federal Reserve bank, or the Federal
Reserve System, with intent to render such bank bill, draft, note,
or other evidence of debt unfit to be reissued, shall be fined
under this title or imprisoned not more than six months, or both."
I would argue that these pennies are not glued down permanently thereby not rendering them useless as currency. We did not cut any of the pennies and they can be pried up when we change the floor again next time. I'm sure there's a way to get the epoxy off as well. Yeah, It's going to be a huge pain in the butt but it's still doable.
How about the penny embossing machines found at zoos and tourist attractions? I've always wondered how they get away with those :)
Great question though! You can read more at: http://wiki.answers.com/Q/Is_it_against_the_law_to_deface_US_currency#ixzz1xztWlnvF
Did you pull the toilet up before doing the floor? Was your floor level to begin with?
ReplyDeleteYes, We removed the toilet before putting down the floor. The floor was relatively level except for a crack in the middle which we had to level out using a very fine cement. Having everything level is going to make things a lot easier!
Delete~Laura
Any idea how many pennies per square foot it took? Love this and considering it when we build our new home, but would like a general idea of how much we will need. Thanks!
ReplyDeleteWhen I went to a home improvement store to buy the supplies, I was talking to one of their associates, and he said that putting epoxy on top of polyurethane like that would cause it to crack. Have you faced this issue at all? Any tips to avoid it?
ReplyDeleteHi Abigail,
DeleteThanks for your question. I have not had any issues with it cracking at all. The layers are VERY thin so this may be why I haven't had issues with it cracking.
Laura
Hi Laura,
ReplyDeleteI make conference tables & custom furniture (www.timneunfinefurniture.com)& thought the pennies would be great for a table top. Did the Poly fill the spaces without any bubbles or imperfections? Ultimately I will run the completed top through my 37" wide sander to bring everything to the same level, buff the pennies & then patina--not much of a question actually, just looking for the best stuff to fill between the pennies.
Thanks,
Tim
Hi Tim,
DeleteIt filled it without imperfections. I just poured it on and gently spread it around with a brush. It seems the more you brush it, the more likely you are to get bubbles. Some of them will come out on their own and I've heard blow dryers help work the bubbles out, too. I'm sure you have more experience with this than me. Good luck and your website looks great!
Laura
Check out epbot.com . Jen and John did a desktop with pennies and have a tutorial there.
DeleteDid you brush the epoxy on or was it viscous enough to spread out with a little help? Most epoxies I have worked with for bonding don't seem like they would spread out much more than a few inches before setting up. Just looking for any tips that might help.
ReplyDeleteThanks,
Colin
Hello,
DeleteWe poured it in areas, one at a time, and spread it out slightly with a brush before moving on to the next area. It seemed to work pretty well that way.
Thanks for reading!
Laura
I just finished collecting the materials I need to start this project. Im putting it down in the living room and I'm afraid that heavy furniture will put a scratch on the final top coat that will be impossible to remove. I haven't experimented or found information from people who have these issues.
ReplyDeleteI plan to use felt between the floor and the furniture but do you have any concerns about the durability of your floor or the thoughts on fixing a potential scratch?
thanks!!
I'm not sure how it would hold up to heavy furniture. I think you will be fine using the felt pads that stick to the bottom of furniture legs. Just be careful whenever you move the furniture around. To fix the scratch may require just lightly sanding the area with a very fine grit sand paper (as to not create more scratches!) and then fill in with epoxy again.
DeleteHope this helps!
Laura
I would like to do something like this in my bathroom, which also has a crappy existing tile floor that I don't want to rip out. Was the grey paint you used a special kind of paint? Outdoor porch paint? Kilz? Was there a reason you picked grey? Did you rough up the existing tile before painting it, and if so, what did you use?
ReplyDeleteThank you in advance for any tips. Your bathroom looks great-I can't wait to get started on mine. :)
Jackie
Hi Jackie,
DeleteThe grey paint I used was from Sherwin Williams and is their "floor enamel" paint. I've used it before outside on a front porch and it has held up great so I figured it would be good on the bathroom floor also. Before painting I applied a bonding primer that I got at Lowe's. That should allow the paint to stick to the existing floor. I picked grey just because I liked the color and I figured it would hide dirt better.
Good luck on your project! I'd love to see some photos when you're finished. Email them to Laura@happyroost.com
This would be great in my kitchen and I am ready to start the project. My concern is how the floor will stand up to the movement of a refrigerator and stove? Gotta move them to clean under and behind them...would the polyurethane top coat be smooth/hard enough to keep the pennies in place?
ReplyDeleteAlso, can the bonding primer be used on top of vinyl tiles? If I could leave those tiles in place it would make a nice substrate as it is even and stuck on real good. Thanks, Linda
Hello,
DeleteI think the pennies can withstand movement from the fridge and stove but I would put it on thicker than usual. Maybe try an extra coat in those areas and kinda "feather" the edges down to make it blend in with the first coat.
Good luck!
Laura
I am obsessed with the penny floor. Family thinks I'm nuts. I want to do a kitchen and eating area. We have a Standard Poodle (60 lbs.). Will his running across the floor if it's covered in polyurethain? We also have white lino.I'm wondering while you didn't grout the floor to fill in the cracks?
ReplyDeleteI have just finished gluing all my pennies onto our bathroom floor! Yah! Glad that is over with. Would you finish it the same way again?? High gloss polurethane and than clear epoxy? I spent so much time on the pennies I would hate to screw it up now!
ReplyDeleteThis comment has been removed by a blog administrator.
ReplyDeleteThis comment has been removed by a blog administrator.
ReplyDeleteWay too cool - great tips too if you wanted to do your own, thanks! I have this linked to my pennies post as well, I'm rounding up all the really good penny projects!
ReplyDeleteThanks for including my project in your post!
DeleteYou can see the post here for even more penny tips:
http://www.inspiremeheather.com/2012/08/project-pennies.html
Laura
After doing some research, I have found out that bonding primer can be overlaid onto a vinyl substrate and is available in a gray color. Now,if I could find out if the penny floor will stand up to kitchen appliances being moved, I would start the project. How many polyurethane coats would adequately completely cover the penny rims? How long would that amount take to dry?
ReplyDeleteIf you're doing this in a kitchen with heavy appliances, I would recommend using a very strong glue (maybe gorilla glue??) That will help a lot. Then I would put down about 3 coats of the polyurethane. Each coat is pretty thick and takes about a day to fully dry. I used a dehumidifier to make it dry faster and that seemed to work well.
DeleteAs long as the vinyl is glued down nice and tight painting it with the bonding primer should work fine.
Good luck and have fun with your project!
Laura
Thinking about doing this to a bathroom, would i have to pull up the current "pile &stick tile" or just put the pennys over it?
ReplyDeleteI would definitely take up the stick down flooring first since that flooring never has a strong bond to the floor. Over time it will definitely roll up at the corners and edges and will probably make a mess with the pennies on top. I know it's more work but I'm sure it's worth it in the end!
DeleteLaura
How heavy is this completed floor? I have a mobile. Won't the floor make the room smell like metal the way coins smell?
ReplyDeleteHello,
DeleteIf you're concerned about the weight then I would test it out by measuring out how many pennies it will take per square foot, weigh them, and then multiply that by the square footage of your bathroom. My guess is that it would be just fine. You can also check what the underlayment is. If it's not a very strong material (sometimes a particle board) you can always replace that with something stronger such as a plywood.
No, the pennies do not smell at all. I washed them before and after gluing them. After they're laid down they got sealed in so that would certainly seal in any "dirty penny" smell there may have been.
Good luck!
Laura
I know you all are talking about using poly to seal the pennies to the floor. I think I would just grout them with non-sand grout. It seems to me that this would hold up a lot better than putting epoxy on them. It would also make it a lot easier to clean and you would not have to worry about your floor cracking etc. Now if you were going to make a table or a counter top etc. you could use what is called bar epoxy and you would get a very smooth finish. We plan to do our back entryway and our kitchen back splash in pennies.
ReplyDeleteHello, you have made some good points! I recommend testing a small area with the grout first. I tested mine first and the grout which was supposed to be black, turned white after a couple of days. I'm assuming there was some sort of chemical reaction between the copper and the lime in the grout. I haven't done any "scientific" research on the matter so it's only a guess at this point, but I would still recommend testing it out first!
DeleteLaura
If you dont seal it the pennies will change colors with cleaning...even water will over time change them..
DeleteThank you for all this information! I am doing the top of an old round pedastal table this week. I've cleaned it and will be painting it satin black)today as well as gathering the pennies (home/old and bank/new). I am making a rounded pattern of old and new pennies so it will look like a mosiac. With only a few square feet this should be a project for an evening in front of the television. Should be quite stunning with the new copper agaist the darker black satin finish. Will be sealing it by the end of the weekend. Sooooo looking forward to the results!
ReplyDeleteSounds beautiful! Hope it turned out great!
DeleteLaura
I saw a youtube video (Penny Floor) where they had a metal 'template' they used to layout the pennies and made individual tiles. This seems like a really good idea, beacuse we could literally make the tiles during the evenings, while watching TV or something...even have a party and have friends/family help. I was wondering if anyone has seen similar templates for sale, I would like to purchase these before starting our project. The template looks like a huge help to keep the coins lined up evenly, etc.
ReplyDeleteI have not heard anything about the template idea but it does seem to be a good idea! You could probably make your own template by creating a grid of some sort in order to keep them perfectly straight. Not sure what you could mount them to though in order to make the "tiles."
DeleteGood luck!
Laura
Mount them to window screening. I'm doing the same thing, inlaying a table my dad made years ago, smashed out the tile, cut the screen to fit, put the template under the screen (google it, it's out there for free) and gluing the pennies down, once I have that done, I'll be gluing the sheet to the table. Easy peasy!
DeleteI'm thinking of using it as a shower floor. Any problems with getting wet? Would it become slippery w the epoxy? Thanks
ReplyDeleteHello,
DeleteYes, the surface will become slippery when wet. I would recommend doing a thinner top coat so that some of the texture of the pennies and spaces in between will still give you some traction.
Laura
This comment has been removed by a blog administrator.
ReplyDeleteHi, I just finished doing this in my daughter's room. I had decided to just use grout to finish. But found that the copper would turn green in places (as copper does) when she would trail water in from the shower or shoes. So now I'm thinking of using the poly/epoxy to finish. However I can't find any polyurethane that says it can be used on metal. What brand did you use?
ReplyDeleteHi Elizabeth,
DeleteMy favorite polyurethane to use on just about anything is Rustoleum. It dries quickly, cleans up with soap and water and doesn't have an odor. It's great!
Laura
how easy is it to mop and do you have to use any special product?
ReplyDeleteIt's easy to mop - I just use a swiffer on it and it works great. Don't use an abrasive cleaner as I would imagine it would leave scratches.
DeleteLaura
I am also doing a floor that measures 13.5x9 and I am at the point of finding a sealer. There are so many out there. I was told to use verathane but it is really thin and seems like it would "run" away. Which one did u use and was it oil based or water based?
ReplyDeleteI love your floor...Im working on my bathroom floor now...I grouted mine in chocolate..Waiting for the grout to dry then useing poly to seal it..Got a lil FYI for people who arent sealing the floor...While I was glueing my pennies down..My mini dashound sat at the doorway pissed because mama wasent holding her...so that night when I finnaly went to bed my lil sweet heart went in and pee'd on my floor...WELL I was also pissed..lol ...when i wiped her lil gift up all the pennies she pee'd on are all shinny and new leaving my hard work of laying all these randomly dark to shinny pennies...So I had to pry up the pennies and redo the spot to keep it looking random...So for anyone who has dog's that pee ...SEAL YOUR FLOOR...lol...
ReplyDeleteCindy
haha, thanks for the info! Interesting!
DeleteLaura
The best working technology of Tile Grout Sealer has been denoted by this post and holding the better look for construction..
ReplyDeleteThank you in advance for your help. I have just collected 50,000 pennies for my kitchen floor - enough for a 12 x 15 ft. area. I'm trying to put together a plan and I stil have a couple of questions.
ReplyDelete1. should I first wash all pennies say in Dawn Detergent as it is a degreaser?
2. does it look nicer if all the coins actually touch each other or nicer if you space them equally apart - this, of course, would be more time consuming but I'm willing if I get a better look. (only want to do it once)
3. would starting right in the middle of the floor and chalk a line right down to the end and leave the inside's for last as walls are crooked - good idea?
4. lastly, i want also to paint my floor grey and was wondering if i could just use the 2 part epoxy on the whole floor instead of doing the high gloss polyurethane (which is softer) and then the epoxy on top. In other word's just use the epoxy. Also, once the crack's are all filled do you want to make sure the epoxy cover's the pennies and not just up to the pennies - right??? thank you again.
Hello, Sounds like the quite the undertaking!
Delete1. Washing the pennies is up to you. Some may think dirt and grease adds to the character. I put my pennies down without washing them and was careful to mix in the brand new pennies with the old to get a mixed pattern.
2. I think this is also personal preference. I think it looks better with spaces in between because the background color can show through a bit and hit hides mistakes a little better. If they touch you have zero forgiveness if you get off a little bit.
3. Starting in the middle isn't a bad idea. I think as long as you start somewhere and go in the same direction the entire time you will be fine. I got off a little bit because I started going in two directions (across and down) at the same time and one of the walls was a little crooked.
4. I'm sure you'll be fine just using epoxy.
Good luck! Send me some finished photos at Laura@happyroost.com
hi, could you put the pennies on over the vinyl if in good condition?
ReplyDeleteI believe so. As long as the vinyl is glued down really well. I say go for it!
DeleteLaura
I'm thinking of doing this in my front foyer. Since the knees are not what they once were I was wondering do you think I could sit at the table and glue the pennies to cement board under layment, just leaving one out where a screw needs to go then screw down the board,grout and seal?
ReplyDeleteNo, because all the seams would look odd and would be noticeable because it is an interlocking pattern. I think you're better off buying some really good knee pads or a stool. Good luck!
DeleteLaura
You can sit at your table and pre-make your tiles using a 12x12 picture frame to lay them out on with the side you want UP facing DOWN, then glue a piece of 12x12 mosaic mesh to the pennies. You'll want fast curing glue in order to flip the tiles out faster. It took me about four or five days to make 40 tiles for our small bathroom, but I wasn't really hurrying.
DeleteHi! Your floor is so beautiful..thinking about doing my bathroom which is roughly 12x8 Scared of that big of an undertaking on my first try so I'm thinking I would do my hearth that my wood stove (livingroom) sits on. I am concerned about the weight on the floor though,as although each leg bottom of the stove is only about the size of one penny,the stove DOES weigh appx 400 lbs! Do you think this is a silly idea,given this weight? Right now the hearth is broken up shards of tile,(a diy project I did a few years ago),but underneath is plywood,and have had no issue with weight on the tile. Wondering what I could use as the sub-floor for the pennies..do you think just plywood would work? Appreciate any tips before I attempt this lol.I'm Canadian so all pennies would be Canadian which just recently have been taken away from our currency...counting on some friends that are copper hoarders I guess! lol
ReplyDeleteDid you use UV blocker in your epoxy
ReplyDeleteHello Laura,
ReplyDeleteThank you for the wonderful tutorial. I have a question for you or any of the other readers that may have some experience in this.
I have a 110 year old home.So my floor is NOT level..lol..What to do then? I want to do my kitchen but am petrified because the floor in not level.
Any help is greatly appreciated.
great :)
ReplyDeleteI am doing this in my kitchen. The process I am using will be gluing the pennies to backing (like the backing of tiles) then using the same method as you would if installing tile. That being said I am open for options. My greatest concern with gluing them down directly and using epoxy is how slippery the floor will be when wet. And I have wood sub-floors so removing at a later time is also a concern. Any suggestions would be welcome. Thanks for your time.
ReplyDeleteWOW, what a very unique idea.
ReplyDeleteI have a linoleum floor with plywood sub underneath, would you suggest pulling that up & using a backer board & paint it?
ReplyDeleteAlso, are your pennies touching? I think I am going to throw all my pennies down to see how many fit & get them in place & then glue
ReplyDeletei'm getting ready to do a small bathroom. Currently has good vinyl on it. Should I put a bonding primer over the vinyl before using liquid nails? I'm thinking probably yes....
ReplyDeleteBeautiful floor! I am getting ready to build a pergola outside and have been looking for the "right" floor for over a year. I saw the pennies a couple of months ago and have decided to buy 14" x 14" concrete pavers to glue the pennies to, then space the pavers appropriately under the pergola. We live in Indiana, with all weather possibilities and I need to know how to properly seal the pennies so they don't discolor AND hold up to freezing cold and extreme heat. Any suggestions for that?
ReplyDeleteI am researching the installation of a penny floor for the front foyer of my friend's new Seattle restaurant. We are concerned that it may be too slippery when wet and I am wondering if anyone has any experience with this question or any solutions?
ReplyDeleteThis comment has been removed by the author.
ReplyDeleteIf anyone is interested, I have pre-made penny coin tile sheets available at: https://www.etsy.com/listing/156223257/individual-11-x-11-sheets-of-real-us?
ReplyDeleteMy 2-cents. Here's something that you need to know before doing this. It is very time consuming, more than you might think. It will take you roughly 45 minutes per square foot to glue them one at a time. Sure, you'll get faster at it but add setup and cleanup for each back breaking session and there you go, you may be pushing an hour per square foot just to glue them in place. Now can you imagine yourself sitting on the floor in awkward positions for more than a few minutes, or hours...or many, many hours? My entryway is only 7 feet wide by 5 feet. That's 35 square feet (hours) of bending over. So seriously plan ahead if you only have a few spare hours a week to put into the project. It's not quick and it's not easy on the back or knees. However, it is an awesome floor.
ReplyDeleteTIP: Find a bucket, (or in my case a cat food bin) about 16" tall. Stand it upside-down and find a pad to put on it. Now lean over with the weight of your chest on the padded bucket. It's not ideal but you can endure bending over a lot longer this way. Also, I used a caulk gun of glue and squirted a dollop on a piece of cardboard, then used a tiny scraper to spread the glue on each penny. I found this to be quicker and less trouble. Hope this helps, I wish someone had told me how much time it took.
what type and brand of polyurethane did you use to seal it?
ReplyDeleteYou can purchase pre-made penny tile sheets at http://www.kvsmintcointile.com .
ReplyDeleteI'm about to do a penny floor in our bathroom. I'm wondering how well the epoxy has held up since you originally posted this
ReplyDelete
ReplyDeleteAre you searching for Jeffamine D230?
Are you tired looking of a lot of sites...
Then here is one of the best website for resins Sohman Epoxy . Apart from this check this one also Solvents similar to your blog. Thank you for the information that you given here...
ReplyDeleteIam very happy to have such a blog here.I searched a lot and at last i find out the apt one..This blog is very informative for me and your knowledge about this topic is appreciable . Sohman Epoxy also contains a lot of information.This website also help me to deepen my knowledge..Just check this one also Epoxy Solvent surely you may get some more details about the topic.Thank you.
Homeowners can even use tiles to help alleviate certain health concerns. Cork tiles, for example, are hypoallergenic and is most commonly installed in kitchens or other rooms where individuals are standing for extended periods of time. carrelage bois
ReplyDeleteThis looks amazing! I can’t believe the patience it must have taken to glue down 10,000 pennies one by one. I’ve only worked with flooring that comes in rolls or tiles, so this really inspires me to think differently.
ReplyDeleteCool
ReplyDeleteThis is a very insightful post—thanks for sharing! I’ve been researching similar topics recently and found some valuable resources on construction and interior solutions at Creative Building BD. Highly recommended for anyone looking for quality work and professional service.
ReplyDelete